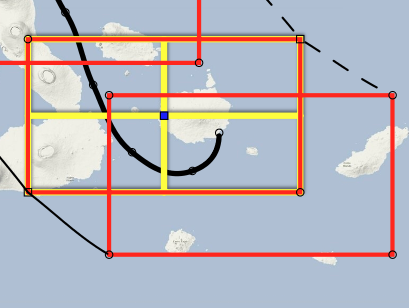
In TrekMap the frames are the boundaries of what is seen in the video, that is the "camera's view". If you would like the camera's view to pan across a map as the trek progress, you can start the staring frame at one side of the map, and the finishing frame at the other side.
TrekMap allows for many intermediate frames as well. The frames can be different sizes, so the camera's view can zoom in and out too.
Normally the camera's view point moves smoothly, but you can also add a "corner" to the frame's path (similar to the regular path).
You can create a new frame by either typing ⌘F, or by using the pull-down menu Edit > Add Frame. You can also switch to the frame editing mode by clicking on a frame.
Select a frame by clicking on its corners. You can then Delete the frame with the d key, Insert a frame between this one and the next with the i key or Add/Append a frame to the end of the sequence with the a key. You can also delete a frame from the Edit Window

In the example on the right the frame highlighted with yellow has been selected. If you click and drag a corner, it will resize the frame. If you click and drag the center, you can move the frame.
If you would like a frame to take place at a defined time, you can "link" it to a time "event". (See event ⌘E about Events.) Events only appear on the "flow" tab. To link to an event either drag the frame to that event, or press "l" and the frame will be linked to the nearest event. If a frame is already linked, pressing "l" will unlink it. If it is linked, the is an orange mark on the flow tab.